I picked a mounting rail from Ergo. The one I selected is a 6" aluminum rail designed to go on standard or M4 style handguards on ARs in case you don't have a fancy quad rail free float handguard on your rifle.
Here it is after I took it out of the package. It comes with three allen head screws, mounting plates that serve as a combination nut and washer, and three little ladder cover sections.

The first step is to remove the lower half of the handguard. Some fit tighter than others. This one was a good deal all around because it came off easily by pushing down the ring but it doesn't wiggle around when it's installed. Here is a pic of after removing the lower half of the handguard.

The instructions say that the screws are long enough to go through a single heat shield but not a double heat shield. This particular upper was a midlength with a Cav Arms fat M4 profile handguard with a single heat shield. I think this model has the single shield mounted farther away from the handguard itself because as you can see in the pic the screws don't come close to being long enough.

I have installed rails like this on M4 double heat shield handguards and sometimes it is a pain because the upper heat shield is glued in. In that case I used a screwdriver and pliers to bend the inner shield up far enough to let the nuts slide into place and then bent the shield back down after tightening the screws. The heat shields may give you trouble aligning after all that bending so be patient and don't give up.
In this case I had to remove the single heat shield. On these Cav Arms handguards they don't use glue. Instead the heat shield locks into notches in the handguard. I used a screwdriver to pry the heat shield out. Here is what it looks like.

Then I put the screws through the rail and installed the little nut/washer combination mounting plates inside.

Next, I put the heat shield back inside the handguard. Here is what that looks like from the inside.

You can see that the little mounting plates are very close to the heat shield. In fact the one on the right in the pic above hit the shield and made it difficult to get the shield to lock into the notch in the handguard. I put a screwdriver blade against the shield and hit the screwdriver handle with the palm of my hand a few times and knocked it into place. The slight damage is hidden when everything is assembled.

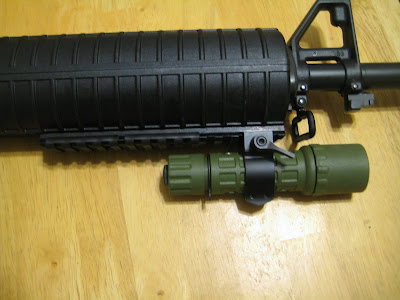
Here is what the lower handguard looks like with the rail on it.

The next question was: What to mount on it to check it out? I have an old Surefire G2 with a Cree drop-in conversion in the drawer and some Warne quick detachable 1" rings sitting around taking up space so I used them.

One thing is apparent right away: I need to add a front side sling mount. They are inexpensive and easy to install but I didn't have one handy when I took the pics.
How does the combination work? Lets see.

In the pic above I was 5 long steps from the front door. You can see the circular outline of the spill beam. The pic doesn't show how bright the light really is. The shadow at the top of the spill beam is from the barrel. There were no sights or optics on the upper so I just rested the camera on top of the rail so I don't know if the picture was taken from the same height above the bore that your eye would be when using sights. I mention that because the hot spot in the center is a little below the front sight post and I don't know if the light is really aimed a little low at that distance or if it just looks like it because of the camera location.
Here I stepped back 2 or 3 more long steps. The hot spot looks centered better but again, I may have had the camera further forward or backward on the receiver. Something that is apparent from the pic below is that with a wide spill beam like this you can identify a person or check out a stranger out at night without pointing your rifle directly at them.

The top and bottom of this particular handguard are almost parallel to each other and the bore so the light isn't aimed up much if any. If I decide I need the light up a little I can pull the center and rear screws and add a washer under the middle of the rail and two washers under the rear end to tilt the light up a little. Like most things that is a compromise because it can't be perfect at every distance. That light is good for 30 to 40 yards max so I'm sure I can find a way to make me happy.
When the rail is mounted at 6 o'clock like this a light with a pushbutton tailcap is not the best solution. The Streamligh TLR-1 or the Insight lights are much better because their switches were disigned to be operated when mounted like this. I'd like to get an angled offset rail so I can mount the light off to the side and make it easier to operate. For that matter I'd like to have a free float quadrail but sometimes I have to settle for good enough. These are good enough.
Ergo is not the only place that makes this type of rail. MI also makes very nice rails. The price on the aluminum rails runs from about $15 to about $25 depending on brand and the length of the rail.
You can also mount these on other firearms. With a little tinkering (and maybe some different screws and/or epoxy) you could easily put one on your lever action rifle or pump or single shot shotgun. All you need are some holes that are more or less in line with the bore.
These are a good way to mount a light on your rifle without spending a lot of money. They also make great gifts.


3 comments:
...great post/pics,i had to shim the light on my CAR(11.5" w/5" suppressor)...i used the metal banding strap from work,the 1/2" wibe is .010" thick,5/8" .015,3/4" is .020...some tin snips, a dremel,and you have a shim for anythig...
Ken, good idea. I wish I had a free source for those straps. If I could find a house under construction I would talk to the contractor about the straps on the brick.
...check any/all the hardware/home improvement type stores too,watch for streched and/or the bent spots,is soft steel so it thins out a little at the stress points...hope it helps...
Post a Comment